- Framed the rough opening to be 1.5" wider than double the width of the door (e.g. 61.5" for a 30" door) and 3.5" taller than the expected height of the door.
- Screwed 2" wide strips of plywood along the middle of the top and right (pocket) side. In a 2x4 framed wall, this should leave 3/4" on each side of the plywood.
- Cut the pocket door track to be 4" less than double the width of the door (e.g. 56" for a 30" door). Installed this pocket track onto the middle of the top piece of plywood.
- Cut three 2" wide strips of plywood that were the equal in length to the width of the door (e.g. 30"). Installed the first piece along the floor using concrete nails since this was in our basement. Installed the remaining two pieces on either side of the top of the left (opening) side with screws.
- Cut ten pieces of 1x4 that were equal in length to the width of the door (e.g. 30"). Installed pieces at the top and bottom of the inside and outside of the right (pocket) side using 2" finish nails.
- Attached the remaining six pieces of 1x4 by attaching them to the plywood with finish nails.
- Cut pieces of pine to a width of 1.25" and a length of 2" less than the height of the rough opening. Installed those pieces with finish nails to the ends of the 1x4's. The idea is that the 1/2" piece of drywall will be installed on top of the 1x4's, and will butt up against these pieces of pine (hence why they are cut to be 1/2" thicker than the 1x4's).
- Cut down the height of the door to the appropriate height by clamping 2x4's to the door to use as a guide for the circular saw.
- Installed the rollers on the pocket door track.
- Installed the pocket door hardware on the top of the door.
- Hung the door and adjusted it to be level.
Showing posts with label Doors. Show all posts
Saturday, February 12, 2011
Pocket Door Installation
We have finished installing the three pocket doors that we will have in the basement. Here is a brief description of the process used for installing the doors.
Monday, February 7, 2011
Video: Custom Pocket Door Installation
Here is a time lapse video showing the installation of one of our basement pocket doors (it actually took just over one hour, but we sped it up so the video is just over one minute).
Monday, January 24, 2011
Plan for Sliding Doors
We have decided on a plan for the sliding doors to cover the appliances in the basement. We considered a number of different options for the sliding doors, including building them ourselves, but we finally decided on getting custom sliding doors from Komandor. It will be a while before the doors are installed as we need to finish the walls and flooring first, but it is nice to have another thing decided. The look we plan to go with is similar to the doors in the photo below, except we will have five doors spanning 14' ... and we won't have the fancy chandelier, shiny floors and generally spacious living area.
Sunday, January 23, 2011
$5 Pocket Doors
We were exploring different options for doors in our basement, and had decided that pocket doors would be the best option because they would save on space. Because the doors would have to be a bit of an odd height (i.e. short), we would need to custom build the pocket door frames and custom order the doors. I did not really like the look of the hollow core doors that are common today, so I dropped by our local Restore and got two old swinging doors for $5 each. These doors will blend well with the old swinging door from our kitchen (stained one on the right) once all three doors are cut down and painted. Total cost for all three doors: $10 including tax.
Friday, October 29, 2010
Inspiration for Wall of Sliding Doors
While it is not yet finalized, it looks like our basement plan will involve having a wall of sliding doors blocking view of the appliances. I think this wall of doors, at about 20 feet long, could make a great focal point. I doubt we will find any (cheap) off-the-shelf solution for this space, so I have been thinking about creative ways to make this a great feature of our basement.
One idea I had was inspired by the Five Doors North restaurant located on Yonge Street not far from our house. I think an eclectic collection of doors painted in different colours would look great, but would it be possible to build this into the rest of the basement design? Would it be too clown/kid looking?
We could keep with the same door theme, but paint them a more muted colour (shades of gray?). Mirror doors are another thought, and they would probably make the basement seem bigger, but I worry about them getting broken by toys, or constantly being covered in kid hand prints. This is probably something that I will make myself, preferably using reclaimed materials, so the options are almost endless.
One idea I had was inspired by the Five Doors North restaurant located on Yonge Street not far from our house. I think an eclectic collection of doors painted in different colours would look great, but would it be possible to build this into the rest of the basement design? Would it be too clown/kid looking?
We could keep with the same door theme, but paint them a more muted colour (shades of gray?). Mirror doors are another thought, and they would probably make the basement seem bigger, but I worry about them getting broken by toys, or constantly being covered in kid hand prints. This is probably something that I will make myself, preferably using reclaimed materials, so the options are almost endless.
Source: Logan Square Kitchen
Source: Spazzi
Source: Gliding Door Company
Source: Momento Italia
Saturday, April 3, 2010
French Doors Installed
We spent some time over the last week hanging the doors on the first floor. The plan is to hang the doors as they are right now (not painted), install and paint the trim around the doors, and then paint the doors after the trim is done. Here is a photo of the two doors to the kitchen. The door on the left was easy to frame, as the door frame was not removed during the demolition, so I just had to re-shim one side so that it would close smoothly. The door on the right was a bit more complicated; the kitchen cabinets were about 1/4" too close to the door, so we had to cut 1/2" off of the door, which meant everything had to be re-framed.
I thought I might show the step-by-step process for hanging the french doors between the living room and dining room. Obviously the process is much different (i.e. easier) with new, pre-hung doors, but we are trying to keep as many original details as possible, so we bought some oak french doors through craigslist (for $30!) and have hung them to the existing door frame.
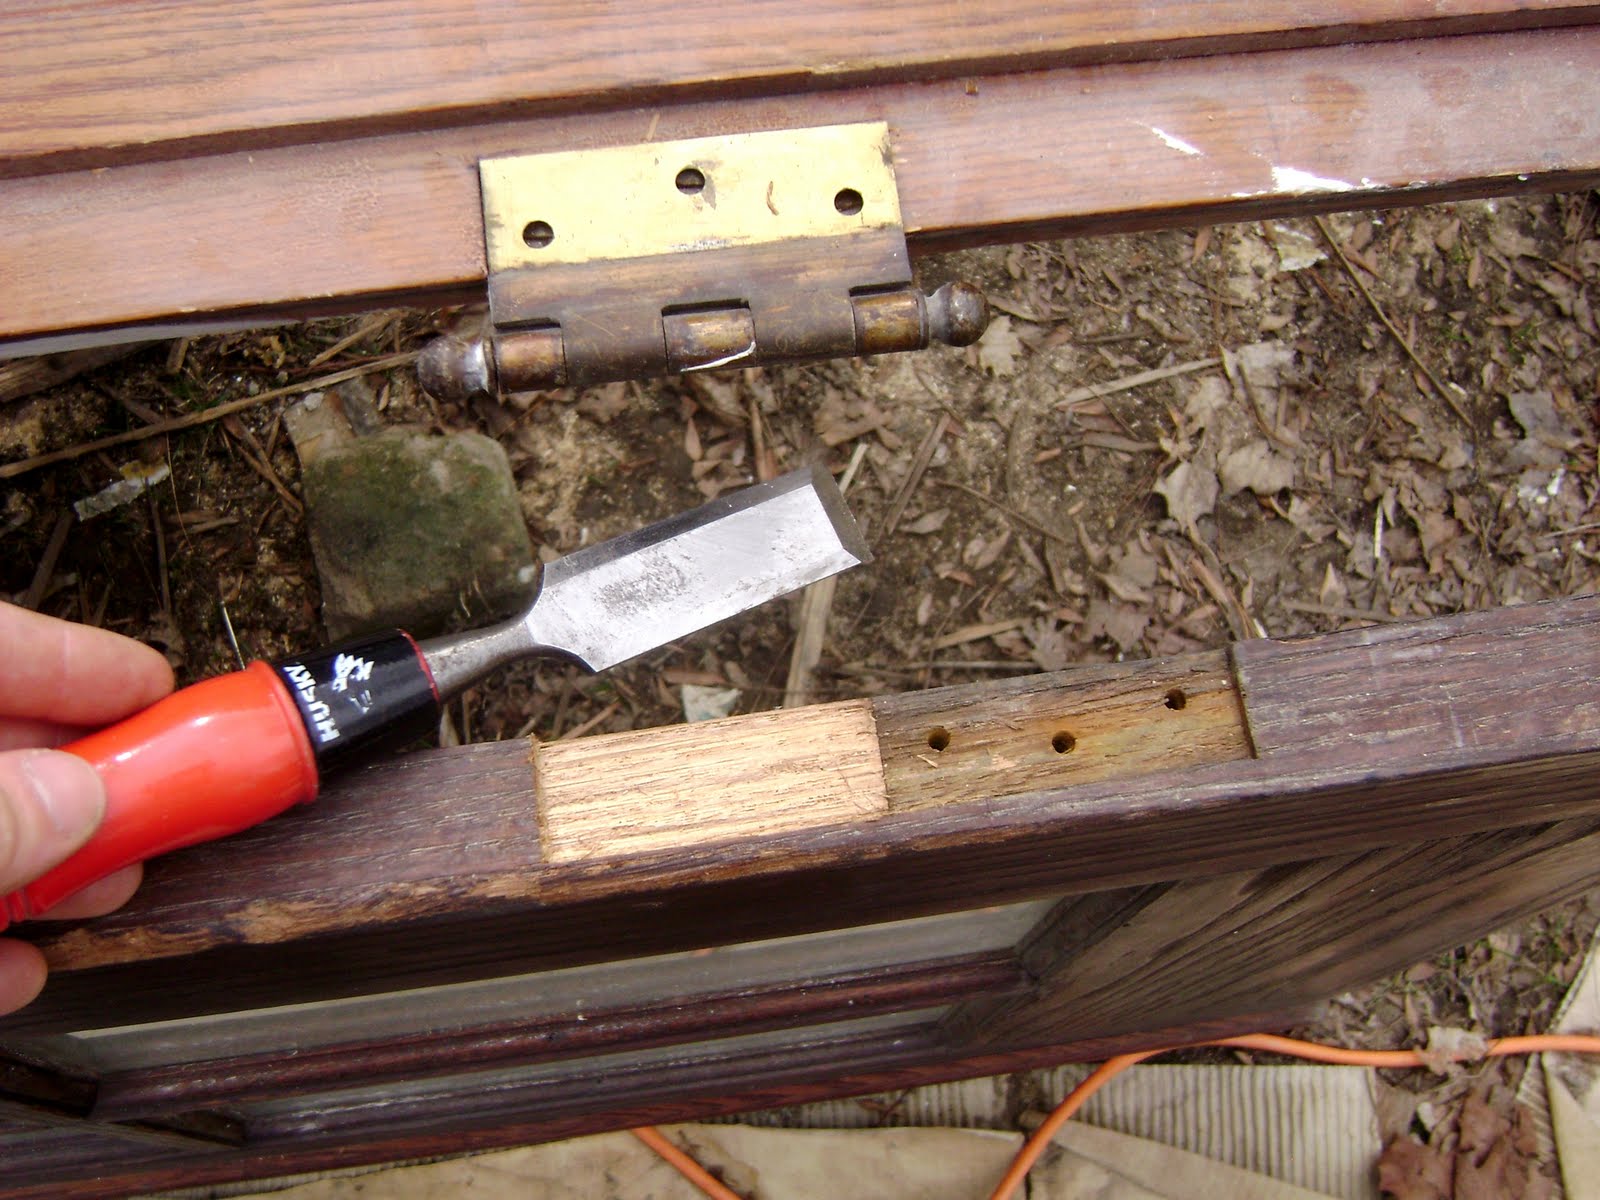
Next up I had to mount the eight hinges: four on the door frames and two on each of the doors. I decided to keep the hinge locations in tact on the door frames, so I just needed to screw those hinges in place. I then lined up the door frames to the doors and marked the locations of the new hinge locations on each door. A wood chisel was then used to remove the wood where that hinge would go.
The top hinge was then secured to the door with three screws, while the bottom hinge was secured loosely with just one screw. This gives you a little bit of play when first hanging the door to the frame. You can bolt the top hinges together and then play with the bottom hinge a bit to line up the bottom hinges and bolt together; once everything is in place, I then secured the bottom hinge with three screws as well.
To hang the first door, I put the door frame (which has been ripped down to the right width and cut to the right length) up against the wall. I drill a pilot hole into the frame beside the top and bottom hinge; the frame is then secured to the stud with two finish nails. These two finish nails should be sufficient to support the door temporarily, so I then hang the door on the hinges (see above for two part process for that). I then open and close the door to make sure the height and angle are correct with the floor. Because the floors and walls are not exactly level in our old house, this is a critical step. When I initially hung the door, it was fine when closed, but would hit the floor when opened past half way. To adjust the height, I would un-hinge the door, remove the door frame from the stud, move it up 1/2" or so (whatever is necessary), and then secure it with two finish nails again. Once the correct height is reached, the door would be secured with two 3" screws that each go through one hole in the door frame hinge. I sometimes add additional screws through the door frame itself.
One door is now hung. I then measure how much space will be needed for the other door and door frame, and then build out the studs and shim accordingly. In this case, I built out almost 4" since the new doors are obviously about 4" skinnier than the doors that used to be in our house.
The second door was then hung using the same basic process described above. However, in this case, extra care was taken to shim the door frame appropriately so that the doors are not too far apart or close together. When I initially hung this second door, it was almost 1" lower than the other door, so I had to remove it, move the door frame up 1", and then re-hang it -- this is why it wais important to hang with two finish nails first and then move onto screws only once you know everything is in place.
Now that both doors were hung, the top piece of the door frame was cut to size and installed with a few finish nails on each side. You can see the 4" of space to the side of the door frame in this photo; we will need to drywall and paint this area since some of it will not be covered by trim.
And presto - we have french doors! They are horribly dirty in these pics, but fit well in the space and do not get in the way at all (we only wanted to add doors onto the first floor if they did not crowd the space). I think these will look great when they are painted white and our original trim is added back onto the door frame.
The first step was to identify the hardware to be used to hang the doors. The hardware that came with the door was smaller than the stuff used in the rest of the house, so I removed it and got replacement hardware from other doors/frames sitting around the house.
Tuesday, March 30, 2010
Stained Doors with White Trim?
We have started working on the doors and trim for the first floor of the house (finally!), but we're not sure how to finish the doors. By the way, I love stained wood ... Meredith likes it and tolerates my love for it. We originally planned to re-stain all of the trim and doors throughout the first floor. At some point, we decided that we would stain the doors, but paint the trim white. We had seen this in a few places, including the house on King of Queens. Now we are re-thinking that plan and considering painting the doors white as well; this is primarily because we don't want the house getting too dark, and because painting is easier than staining.
Some additional considerations:
- We have five interior doors on the first floor: two solid doors separating the kitchen from the basement and living room, two french doors separating the dining room and living room, one solid door for the first floor washroom.
- Four of the five interior doors are currently stained, so they would just need to be sanded and re-stained if we go that route (the fifth will need to be stripped first).
- Our current front door needs to be painted (the wood has been ruined by the dogs, so it would be difficult to make a stain finish look good), and we could go any route when we replace the door in the future. I love the black front door installed by the Rambling Renovators. The new exterior doors we installed in the sunroom are currently primed white, but still need to be painted, so we could go black with those as well. I imagine if we stain the interior doors, we would go black paint with the exterior doors. If we go white with the interior doors, we could do any colour we want with the exterior doors.
Any thoughts? What do you think about stained doors with white trim? Here are some pics of stained doors with white trim I found on the internet. The stain in the third photo is closest to the darkness of our stain.


Update: I was recently flipping through a book entitled Old House New Home: Stylish Modern Living in a Period Setting. It is a great book with ideas for decorating an older home, and is very helpful with these types of decisions regarding an older home.
Subscribe to:
Posts (Atom)